The consent management window can be opened by navigating to “Messaging” > “Communication Consent”. This window contains a grid which displays consent on a granular level for all customers, as well as an export feature to extract the filtered data for use in marketing systems like Mailchimp.

How to Filter the Consent Management Grid
You can perform a general search in the grid by using the Search Bar at the top of the page. This will search for matches in a number of fields such as Customer Name, Reference, Email Address and Mobile Number.

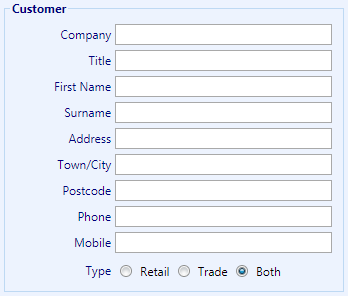
A more granular search can be performed using the filter options on the left-hand side of the window. These filters allow you to search your customer base for specific fields – for instance all customers in a particular company, or all trade customers.
In addition to these customer filters, you can also filter by Consent status and Booking Date, Type and Quantity. The Consent filters allow you to find customers with valid or invalid consent for certain dates, meaning that you can filter out all customers without valid consent for a marketing email or find customers that need contacting soon to renew their consent for a particular communication method.
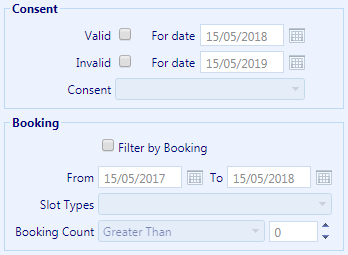
The Booking filters allow you to select only customers with bookings in the diary between certain dates. You can further refine this filter by selecting only customers with bookings of a certain type (or types), or customers with a set quantity of bookings between the given dates.
Once these filters have been applied, you can export your resulting data set to a spreadsheet for use in other applications, or for external processing. For more information on exporting from the Consent Management window, read the article “Export a spreadsheet of customers with consent”.
Understanding the Grid Data
The grid on the right-hand side of the screen displays the results of your filters. This grid will provide a list of all customers who match your filter criteria, as well as an overview of their consent status for each communication method (SMS, Email, Phone) and communication type (Reminders, Marketing).

Green cells mean that the customer has given valid consent for that kind of communication. Red cells mean that the customer has not given consent for that kind of communication (Or that their consent has been revoked, or has expired). Amber cells indicate that consent is currently valid, but that it will expire soon. By default these cells will display as amber if consent will expire within 12 weeks, however this threshold can be adjusted using the “Config” option in the top-right of the grid.
The “Messages” column in the Consent Management Grid displays the number of messages currently queued for that customer. This includes all messages for that customer, including all those that require consent (and those that do not).

The “Messages” column will also display a yellow warning triangle if there are consent issues with any messages in the queue – that is, if some messages cannot be sent because the customer currently lacks the required consent. If you hover the mouse over this warning message, it will display a summary of the consent issues that currently need to be resolved for that customer. You can click on the warning icon to open the Add Consent window, which will automatically tick all of the checkboxes required to gain consent for all queued messages.
Managing Individual Customers
Consent can be added for any individual customer in the filtered consent grid by first selecting the customer row with a left-click, and then clicking on the “Add Consent” option in the grid toolbar (at the top of the window).
You can view the consent history for a specific customer by right-clicking on their row in the grid. This will open the Communication Consent tab on the Add/Edit Customer window, showing you a record of all consent items for that customer and allowing you to add or revoke consent as necessary.