The takepayments Transaction Gateway is a new feature in VGM that offers an alternative to the “Add Sales Receipt” or “Add Sales Refund” forms when using the Take Payments integration for card transactions.
Instead of choosing “Add Sales Receipt” or “Add Sales Refund,” you can also open the takepayments Transaction Gateway by clicking the takepayments button at the top of the grid.

Sales Receipts
Sales Receipts linked to takepayments transactions are marked with a smiling pink wallet icon in the last column. Those without the link remain unmarked.
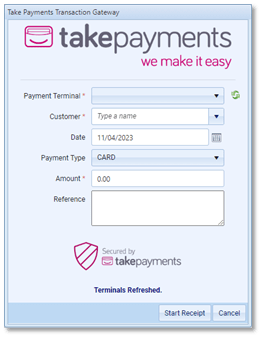
To create a Sales Receipt through the takepayments Transaction Gateway, follow these steps:
- Select the Sales Receipt in the grid.
- Click the takepayments button to open the Gateway.
- Choose a connected payment terminal from the “Payment Terminal” dropdown list. Use the refresh button if needed.
- Select a customer and a date for the Sales Receipt.
- Choose a “Card Payment Compatible” payment type from the “Payment Type” dropdown list. (Payment types can be modified by navigating to Financial > Financial Settings > Payment Types).
- Enter the receipt amount and any additional reference notes.
- Click the “Start Receipt” button to initiate the transaction.
A new window will appear while VGM communicates with the card terminal and takepayments servers. Do not close or refresh your browser during this process. The transaction will be handled through the card terminal.
If the transaction is approved, the takepayments Transaction Gateway will close, and a Sales Receipt with the takepayments Transaction ID and timestamp will be generated.
Sales Refunds
Sales Refunds linked to takepayments transactions are also marked with a smiling pink wallet icon in the last column. Unmarked refunds aren’t linked to Take Payments.
Creating a Sales Refund is similar to generating a Sales Receipt, but with the “Start Refund” button instead of the “Start Receipt” button. Note that non-contactless refunds often require the cardholder to insert their card and enter their PIN for approval.
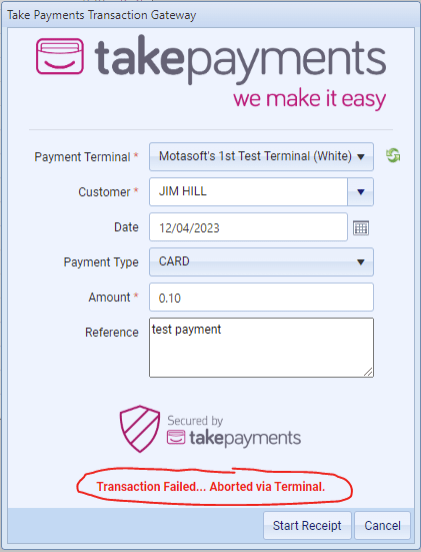
Failed Transactions
Here are some possible reasons for transaction failures, along with a brief explanation:
- Transaction Failed: Timeout (### Seconds)
The terminal did not receive any input within the specified time limit. - Transaction Failed: Terminal NOT Connected
The connection to the terminal was lost, which could be due to Wi-Fi issues. - Transaction Failed: Terminal NOT Authenticated
There is a problem with the terminal. Check its status in the settings tab. - Transaction Failed: Terminal appears to be busy
Another transaction is in progress on the selected terminal. - Transaction Failed: Card issuer has declined the transaction
There is an issue with the card issuer. - Transaction Failed: Aborted via Terminal
The transaction was cancelled from the terminal.